
Suppose you are alerted to traffic at 12 o’clock, five miles, same altitude.
Instinctively, we look to the horizon. However, that’s not quite correct due to the curvature of the earth. Even only 1000 feet in the air, the horizon in the distance is 1.5 degrees below level. By 10,000 feet, that’s about two degrees.
Two degrees is about the width of one finger held out at arm’s length. So if you are flying at 10,000 feet or lower, you need to hold your arm out in front of you at arm’s length and put the bottom of our finger on the horizon. The traffic is somewhere behind that finger, which is a really small slice of the sky just above the horizon. Put the finger down now and look for traffic right there.
Suppose the traffic call was 12 o’clock, five miles, 1000 feet below. Would you look much lower? Not really. A point 1000 feet below you and ten miles away is only one degree down visually. So 1000 feet below and five miles away is two degrees down. If traffic at your altitude is directly behind your finger held at arm’s length, then traffic five miles away and 1000 feet below is just below your outstretched finger. Traffic five miles away and 1000 above, is just above that finger.
In other words, look for traffic two finger-widths above the horizon to one finger width below. That’s where all the traffic is that matters when it’s approaching unless it changes course or altitude.
Get More Pilot Tips from PilotWorkshops Online
Unfortunately, it’s not an unknown IFR error to try a single approach again and again, until impatience, stress or fuel issues result in an accident.
To better manage the risks and temptations of flying multiple instrument approaches, first and foremost you must commit to flying the procedure precisely and by the book. Remember that fatigue, complacency, and temptation to fly just a little lower are constant threats when flying multiple attempts at an approach in low IFR conditions. These threats are what make multiple approaches more dangerous than the first.
As a guide, if you miss an instrument approach, do not attempt the same approach again unless one of these three conditions exists:
1. You have good reason to believe that the weather conditions that required you to miss were temporary and that they’ll improve in time for your second attempt.
2. You can identify a specific technique or part of the procedure you flew incorrectly that caused you to miss, and which you can honestly say you’ll get right the next time. For example, you may not have been completely set up at the final approach fix the first time, and were behind the aircraft for the entire approach. This time you will be certain to be in configuration and on speed before the fix.
3. You’re facing a true emergency and because of equipment failure, unforeseen weather conditions or your own poor planning you have no better options within your remaining range and you must try again before you run out of fuel—a truly dire scenario.
If none of these three conditions apply and you attempt a second approach anyway, you’re just wasting time and the fuel you need to get somewhere else with better conditions or lower approach minimums. More importantly, you’re tempting the human failings that often turn multiple approaches into accident reports.
Get Pilot Tips from PilotWorkshops Online
If you fly with electronic flight displays, including carry on devices, do you find that you are inclined to spend more time looking inside the aircraft than outside when flying VFR?
We all develop what are called habitual behavior patterns. We have ways of interacting with something, and then we do the same thing in the same situation over and over. So, our habitual behavior pattern when we interact with screens typically involves staring at them for extended periods of time. Think about your work computer or scrolling social media on your phone. When we get into the aircraft, it’s easy to fall into the same pattern and become absorbed with the flight displays and lose situational awareness. That’s true of a glass panel or other tablet or screen. Failure to consistently scan outside of the aircraft is common.
Loss of situational awareness is a common cause of aviation accidents, and fixation on all the information a digital display offers can be just as dangerous as fixation on a minor aircraft problem, a specific instrument, or a distracting passenger.
Habitual behavior patterns aren’t all bad. Think of aircraft pre-flight or preparing for an approach. Repeated actions can build efficiency and reduce errors.
So, minimise your fixation issues by building the right habit patterns. First, be thoroughly familiar with your on board and carry on devices. The more time spent searching for the right button or screen, the less time you have to look outside. Simulators and practice time with a ground power unit are great ways to master on board equipment. For carry on devices you should fully familiarise yourself with the features and operation, including simulatiing a flight if that feature is available, before using it in flight. Be sure your systems and devices are up to date and you can easily locate the features you need.
When you get into the aircraft, build the habit pattern you want. Practice minimal interaction with your screens in flight with conscious breaks between long inputs of data or knob turning to just look outside and fly. Place your carry on device where it is in your line of sight for the windscreen without blocking your view. Finally, resist the temptation to use any personal devices not needed for the flight.
Get Pilot Tips from PilotWorkshops Online
A go-around during the flare or a rejected landing can be a difficult manoeuvre. Slow airspeed and high power create the greatest number of left-turning tendencies. Further, adding the power causes a pitching up moment which if not corrected can cause the nose to rise quickly and the aircraft could stall. Both of these things need to be corrected promptly. This is why it is so important to include training on these manoeuvres into initial and recurrent training.
First the pitch up. Since the airplane is normally trimmed for the proper approach speed and at low power, when we add full power, the nose will pitch up significantly. We need to be prepared to counter this with forward elevator. If you add the power smoothly while watching the nose in relation to the horizon by looking out at the 10:30 to 11:00 position of the windscreen, you can keep that nose from climbing more than it should. Then you can begin to get the aircraft slowly back in trim. Follow your POH regarding clean up, but be careful not to move flaps or gear until you have good control of the aircraft and then only one thing at a time and re-trim between steps.
Some pilots trim nose up during the flare. Doing this will complicate the out-of-trim condition if a go-around is required.
Now for the left-turning problems. These are at their worst at this time because of the high nose attitude and P-factor (asymmetric blade effect) is at its greatest. So you need to anticipate a need for lots of right rudder as you are adding power. Again you will have to watch out the left side of the engine cowling and keep that cowling aligned with the left side of the runway. Another clue to proper rudder control is to check the ailerons. If you are holding a lot of right aileron, you need more right rudder.
When executing a rejected landing there is no reason to add the power quickly, usually just a little power and a slight pitch up will keep you in the air. So add the power positively but only at a rate that allows you to maintain control of the aircraft.
Get Pilot Tips from PilotWorkshops Online
Aircraft generate static electricity just moving through the air; thus the static wicks common on the trailing edges of the flight control surfaces—to give the electricity an easy path off the airplane. When the flying stops, so does the wicking away of static charge. You might even generate a charge as you move about the airplane. Dry air and wool fabric, for example, combined with a little friction, can easily build a small charge. This residual charge could arc to the fuel nozzle as you near the filler port—unless you have properly earthed the aircraft.
But the location of that earth wire matters. Few GA manufacturers specify in the pilot operating handbook where to attach the wire and even fewer GA aircraft have an earthing point for this purpose.
To do its job, the wire must have an electrically conductive path to the fuel port. Corroded surfaces should be avoided for connection because they degrade the electrical path. Similarly, painted surfaces are less conductive than unpainted ones, although in most cases clipping to a portion of the painted landing gear or a painted tiedown ring will not present a significant danger. An unpainted portion of the nosegear structure, an unpainted tiedown ring, or an exhaust stack will usually work well.
The best way to test a location for your airplane using an ohmmeter and a long jumper wire. Clip one end of the wire to your desired location and the other to one of the clips on the ohmmeter. Clip the other connector line from the ohmmeter to the filler neck. The resulting resistance shown on the meter should be less than one ohm. If you’re not familiar with voltmeters/ohmmeters, seek the help of your local maintenance engineer or someone who is familiar with checking resistance measurements.
Remember that even the movement of fuel through the nozzle and into the filler port can generate static electricity. Keep the metal nozzle in contact with the metal ring on the filler port to prevent a spark - BUT make sure that the filler nozzle is not scraped up and down the filler port as it may shave off small pieces of softer metal that fall to the bottom of the fuel tank, where they can cause your fuel test drains to leak
Get More Pilot Tips from PilotWorkshops Online
The instrument scan should be easier with modern glass displays, but for many experienced steam gauge pilots, it’s not.
Consider the altimeter. In level flight, the hundreds needle is usually either straight up or straight down because the altitude you’re holding is either a thousand-foot increment or a thousand plus 500. It’s simple to detect a deviation from needle straight up or needle straight down, even without looking directly at the altimeter. Not so on glass displays, where it seems necessary to look at the altitude tape and process a number.
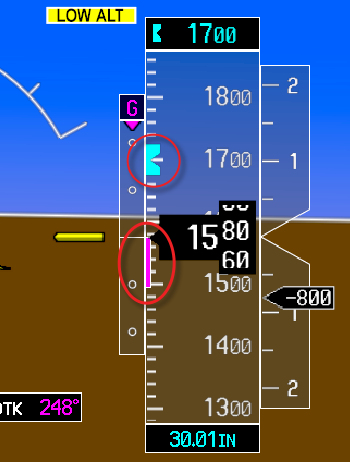
The solution is using bugs. Set the altitude bug to your target altitude and you’ll see at a glance the relationship between the bug and the altitude pointer. There’s no need to read a number with each scan. That works equally well for any altitude, and for headings and airspeeds too. In many setups, you’ll even get an aural warning when approaching or departing bugged altitudes.
Trend indicators are another helpful feature of glass panels. These are typically magenta lines extending out from the pointers on each performance instrument, that show where you’ll be six seconds in the future if nothing changes. The magenta color stands out even if you’re not looking directly at it. If you’re attempting to maintain altitude, the trend indicator may be your first sign of a deviation, before the altitude itself changes noticeably.
The instrument scan is a crucial IFR skill. For VFR pilots, the more efficient the time spent inside the cockpit is, the more attention can be spent where it belongs: out the window. Practice setting bugs to target values and watching for trend indications, and you’ll soon find that you never want to go back to steam gauges.
Watch this video for more tips about glass cockpits from PilotWorkshops IFR: The Missing Lessons.
Get More Pilot Tips from PilotWorkshops Online
Mechanically, it doesn’t matter which magneto you check first. As long as you check both you’ve accomplished the task.
However, there’s a reason many manuals recommend checking the right magneto first, and then the left. Doing it in this order helps ensure both magnetos have been selected prior to takeoff.
When checking your mags, go two clicks to the left (which selects the right magneto), then back to both mags, then one click to the left (selecting the left magneto), and again back to both. This does not guarantee that you’ll be on both magnetos when you take off, but it guards against the error of thinking you switched to back to “Both” for takeoff when you actually switched one click from “Right” to “Left.”
When we check the mags, we’re checking three things. One is that the magneto grounding wires are still connected. If not connected, then there will be no drop in RPM when you select that magneto. Second is that the drop in RPM falls within the recommended limits as defined in the POH. This says the remaining mag can provide sufficient spark to keep our engine running, even if with less than full power. The third is that the differential drop between magnetos is within limits, which might clue us in to a mistimed or other mag issue we should check out before the flight.
With only one mag, we have less power for takeoff.
Get More Pilot Tips from PilotWorkshops Online
A Dead Mag check looks for a magneto that should be functioning but isn’t (that is, it’s dead). A Live Mag check looks for a magneto that shouldn’t be functioning—but is. The dead mag check will just save you some aggravation, but the live mag check could save a life.
The Dead Check happens right after startup. Select each mag in turn. There should be a small drop in RPM, but no other changes. If a mag is dead or dying, it will be readily apparent and the flight is over before taxiing. Sure, you would have found it at the runup (and you’ll still do that runup check later) but a quick check now could avoid an unnecessary taxi out and back.
The Live Check happens just before shutdown. Remember that magnetos will generate a spark whenever the prop is rotated. The only thing that prevents a spark inside the cylinder is the P-lead, a wire grounding the Mag output to the airframe. If that circuit has broken anywhere—inside the mag, along a wire, or at the ignition—the mag is live, even with the keys in your pocket. Anyone turning the prop could potentially cause the engine to start and cause grievous injury or death.
Before you shutdown with the mixture control, switch both mags off just long enough for the engine to stumble but not die. Switch the mags back on, and then proceed with your normal engine shutdown procedure. Don’t delay in switching the mags back on - excessive delay could result in a backfire. Obviously, if the engine continues to run with the mags supposedly shut off, get an engineer to check it out before the aircraft flies again.
After the engine is shut down but before you remove the keys, you should also give the key a gentle pull at both the left and right positions. If the key comes out in any position except ‘off,’ the switch should be replaced immediately.
One last point: Even with both dead and live mag checks, it’s still best to consider a prop ready to kill you whenever you touch it.
Get More Pilot Tips from PilotWorkshops Online
First, slow down and hold between best glide speed and about 10 knots below it. That’s because:
a) best glide is usually published for gross weight and you’ll be somewhere under that unless you just departed, and
b) minimum descent rate will actually maximize your time before landing. Minimum descent rate is roughly halfway between best glide and clean stall speed.
Given this is a high-stress moment, holding between best glide and best glide minus 10 is fine.
Assuming you’re flying from the left seat, circle to the left with banks of 10-30 degrees. Stay within half a mile of your target field and assess two things. Plan your final approach to steer clear of big obstacles, such as trees, buildings, and—if you can see them—wires. Plan to land as into the wind as practical. You want to land as slowly as you can, and spread out the deceleration. It’s a sudden stop that kills.
If you have time, squawk a mayday with at least your transponder and run through a quick flow to attempt a restart. Just remember “fuel, air, spark.” If the windscreen is covered with oil, skip the restart part. Also, keep lookout for a secondary field in case your selected site turns out to be unsuitable—such as suddenly seeing those power lines.
The spiral is part one. Its goal is a key position at 1000 to 1500 feet AGL and abeam your target touchdown point. Adjust your last spirals with varied bank angles, or even a slight slip, to reach that key position.
Now level the wings and descend maybe another 200 feet, depending on the wind, before turning back to the field. Adjust your circuit as needed to ensure you make the field. Fly a bit wider, side-slip on base, or even s-turn a bit if you’re too high. Bank up to 45 degrees and head straight for the touchdown target if you think you’ll land short.
Approach with no-flaps, gear up and propellor fine pitch if relevant, in a light aircraft until you are sure you will make the field. That way you can drop the landing gear, if relevant, and add flaps from zero to full for maximum slowing and drag on final.
This spiral-down plus power-off landing takes proficiency. Go out with an instructor and practice at a suitable aerodrome so you can try it all the way to landing.
Here is a video where Jeff Van West and Keith Smith work through an engine out emergency scenario.
Get More Pilot Tips from PilotWorkshops Online
As part of a pre-flight Check A it is normal to check the propellor for condition, which requires the propellor to be turned by hand.
For typical direct drive-engines, such as Lycoming or Continental engines, you can turn the propellor in either direction, but the best way is to turn it in the reverse direction of normal rotation, for one main reason. If one or both magnetos have an impulse coupling for starting, you will not engage the impulse coupling in the reverse direction. In the rare case where there is a hot magneto and fuel in the engine, you will avoid having the engine fire as you rotate the propellor.
If this procedure saves a life or prevents an injury once in a while, it’s well worth it and, even if your aircraft does not have an impulse coupling, it is still a good practice to be in the habit of turning the propellor backwards.
Some people say you can break a vacuum pump vane by turning the propellor backwards, but it is better to break a vacuum pump vane than to endanger a human life by having the engine fire unexpectedly.
Turning the prop backwards is a normal procedure during compression testing and during magneto timing. It also makes sense to turn the prop backwards to put the tow bar on. Adopting this practice just might save a life one day.
NOTE: This does not apply to Rotax engines, or others, where the propellor is driven through a gearbox. If you are at all unsure check your Engine manufacturers instructions or ask someone who knows.
Get More Pilot Tips from PilotWorkshops Online
Helicopters create wake vortices and downwash, which are different things, and you absolutely should steer clear of them—perhaps even more so than aircraft.
The air that is sent swirling when a helicopter hovers or does a slow air taxi is called ‘downwash.’ Downwash is absolutely a source of turbulent air and a hazard to people and aircraft that are nearby. Most helicopter pilots understand this and do their best to avoid risk to those around them. But it’s still wise to make sure loose items are secure—including light airplanes—if a helicopter is hovering nearby. Most sources say the risk area is three times the rotor diameter from the edge of the rotor arc of the helicopter. The rotor diameter of a Robinson R22 is just under 8 m (25 ft) and for an R44 it is 10 m (33 ft). Three times that plus the radius of the rotor itself means being 32 m (100 ft) from an R22 or 40 m (132 ft) from an R44.
Once the helicopter is in forward motion over about 20 knots, however, it produces wake turbulence trailing behind it similar to an aircraft. This wake can drift in the wind, just like aircraft wake turbulence. However, helicopter wake doesn’t always sink right away. It can even rise. Three minutes is the recommended duration to wait before landing behind a helicopter, even if you think it’s not much bigger than your aircraft. Failure to do so could create a situation like a Cessna 120 that was captured on video and made the rounds of the internet a while back.
Other links:
https://skybrary.aero/articles/wake-vortex-generation-helicopters
https://www.liverpool.ac.uk/media/livacuk/flightscience/projects/cfd/wakeencounter/caa_helicopter_report.pdf
Get More Pilot Tips from PilotWorkshops Online
Aerodynamically, it doesn’t matter. You will lose altitude just as quick in a left or right slip. But that doesn’t mean one way isn’t better than the other.
First, is there a crosswind? If there is, slip with the wing down into the wind. Then you’re already slipping the right way to counter the crosswind. The transition from forward slip to side slip will be simpler and less dramatic.
If there’s no crosswind, you have a choice, and it may come down to personal preference. A slip to the left is often preferred in side-by-side airplanes since it provides better visibility. It also offers a smoother transition from a left base to a slipping final.
Slips might cause the indicated airspeed to be unreliable, especially if you have a static port on only one side of the airplane. And airspeed control in a slip is important. If you don’t lower the nose, the airspeed will decrease. You should know how much to lower the nose and what sight picture is appropriate, even without reference to the airspeed indicator.
To a passenger, a slip can be disorienting, increase anxiety, or even cause motion sickness. They just feel wrong. Rather than make your passengers uncomfortable, maybe go around instead and try again. On the other hand, if you fly something like a Stearman or a Pitts, slipping might be required just to see the runway.
Know your Pilot’s Operating Handbook and any limitations or recommendations regarding slips in your aircraft, and practice slips to perfect your technique.
Why not add side-slipping to your re-validation flight with an Instructor?
Get More Pilot Tips from PilotWorkshops Online
We all learned to check the mags during the run-up before flight. Magnetos, ignition harnesses and spark plugs degrade over time, and this wear and tear can and will over time lead to ignition problems. When these problems have got severe enough, the mag check will fail, and we will taxi back to parking to have a mechanic figure out what’s wrong. Needless to say, the flight is canceled.
Some pilots like to do an additional mag check in flight, typically at the end of the cruise segment before starting a descent. Why would one do that? Well, the idea is to detect a developing degradation of the ignition system before it starts to impact performance or the safety of flight, so that repairs can be made at a convenient time – as opposed to cancelling a planned flight when the ground run-up is the first time we see any signs of concern.
How does an in-flight mag-check provide that early indication? Do the mags work any harder in flight than on the ground? No, they don’t. What is different, though, is that a stronger spark is needed in order to ignite the fuel/air mixture at normal cruise power settings than at the very rich and barely-above-idle power setting we normally use for the mag check on the ground. That’s especially true when running lean of peak EGT. Meaning that a gradual decline of the spark will be noticeable in-flight at cruise power long before it shows any abnormal signs during a ground mag check at 1,700 RPM.
So, with that knowledge, we can perform an occasional mag check in cruise. A little roughness is normal when switching to just one magneto, but a very rough running engine or a complete EGT drop-out on one cylinder is a sign that it’s time for maintenance at the next convenient opportunity. Take note of which cylinder had the EGT drop-out, if you can, and whether it happened with the ignition in the RIGHT or LEFT position. This information will tell your mechanic exactly which spark plug had the issue, and it will greatly reduce the time needed to troubleshoot on the ground.
Alternatively, an after flight mag check, before shut-down, might also reveal a developing issue that can be investigated before your next flight. In any case, you should be doing a dead-cut check on the mags before shut-down to make sure you don't have a live mag.
One final piece of advice: Should you experience a complete loss of power on one magneto, resist the strong temptation to immediately turn the ignition back to BOTH. Instead, pull the throttle back to idle. Then wait a second before bringing the good mag back online.
Why prolong the power loss, you ask? To save your exhaust system. When a cylinder isn’t making any power, fuel and air are nonetheless going through it. There’s just not a strong enough (or any) spark to ignite combustion. So the unburned fuel and air mixture goes into the exhaust system, where it remains combustible. If you turned the mag back on at full power, you could introduce enough heat into the exhaust to ignite the unburned air and fuel mixture waiting there, which would result in a scary bang in the best case, and damage of your exhaust in the worst case. Bringing the power back to idle mitigates against that.
To see guidance for performing an in-flight ignition check, see these pages from “Airplane Engines: A Pilot-Friendly Manual.”
Get More Pilot Tips from PilotWorkshops Online
In most of our flying, say at cruise or constant velocity climb or descent, you don’t feel being pulled in any direction because all the forces are in balance. That feeling of being in free fall happens when something causes an imbalance. On any given day, the lift generated by your aircraft is proportional to the square of the velocity times the absolute angle of attack.
By retracting your flaps, the angle of attack decreases, so that sudden loss of lift makes you descend toward the earth. The key here is to increase the velocity at the same time to compensate for that smaller angle of attack.
You may wonder how this will help avoid sink, since by pushing forward on the stick to increase airspeed you are also lowering the angle of attack even more. That’s true, but let’s take another look at that formula above. The velocity is squared in that expression, so that means it has a larger impact on lift than angle of attack does.
So how can we apply this information to retracting flaps? Start by getting some practice at altitude alone or with an instructor. Set up your takeoff flap setting and climb speed and then try retracting your flaps. To maintain constant lift, push the controls forward slightly before and during the flap retraction.
You probably won’t get it right the first time or two, but don’t worry you will soon get the timing of the forward control pressure just right. And that "flap sink" will be a thing of the past.
Get More Pilot Tips from PilotWorkshops Online